Instruments
Instrument Types
picoTracker supports several different types of instruments, each with its own unique capabilities and parameters. You can switch between instrument types using the Type field at the top of the instrument screen.
Switching Instrument Types
- Navigate to the instrument screen by pressing
NAV+RIGHTfrom the phrase screen - By default the
NONEinstrument type is selected - Press
EDIT+LEFTorEDIT+RIGHTto cycle through the available instrument types:- SAMPLE: For playing back WAV samples with various effects
- MIDI: For controlling external MIDI devices
- SID: Emulation of the Commodore 64 SID chip
- OPAL: FM synthesis emulating classic PC soundcards
- If you've made changes to the current instrument, you'll be asked to confirm before switching types
- Note that you cannot change instrument types while playback is active
Importing and Exporting Instruments
Once you've created an instrument, you can save it for use in other projects:
- Make sure your instrument has a name set in the "name:" field
- Select "Export" on the instrument screen
- To import a previously saved instrument, select "Import"
Sampler

-
sample: Selects the .wav file to associate with this instrument. You can use the same sample in more than one instrument. Tap
ENTER,ENTERto go to the Sample Import Screen which lets you load new .wav files into your project, with the last imported sample selected as the sample assigned to this instrument [1] -
volume: Set the volume of the instrument
-
pan: Pans the instrument left or right (0x7F is center)
-
root note: The root note of the sample
-
detune: Detune the sample by the number of semitones
-
drive: This is a volume modification before crush, and the instruments volume is after the crush
-
crush: Decreases the bit resolution
-
downsample: Decreases the bit rate (eg. low frequency aliasing whines). Each increase in this value will downsample the original sample by a factor of 2
-
cutoff: Set the Filter cutoff frequency
-
reso: Set the Filter resonance frequency
-
type: The filter supports continuous change from low pass to high pass. Set type to
00for low pass.FFfor high pass and7Ffor band pass. All intermediate values morph in between them -
dist: Set the filter distortion. Available values are
noneandscream -
interpolation: Interpolation mode ('linear'/'none'). Selects which interpolation mode is used when in between samples.
Linearinterpolates linearly whilenonetakes the nearest neighbor. Use none when playing samples at low range to add some typical overtones. Note using linear interpolation currently adds significantly to the CPU load during playback. -
loop mode: selects the looping mode.
nonewill play sample from start to finishloopwill start at the start and loop from loopstart to end.looper syncwill automatically tune a loop so that it plays exactly 16 bars. Use the root note to play twice faster/sloweroscillatoris a special mode where the loop selection (from loopstart to end) is taken as oscillator data and automatically tuned. Note that 'root note' can be used to tune the oscillator back in a useful range
-
start: start point of the sample regardless of if loop is enabled (note value is in hex)
-
loop Start: start point of the sample when loop is enabled (note value is in hex)
-
loop End: end point of the sample (note value is in hex). You can play samples backwards by setting the end value lower than the start
-
automation: If On, the table play arrows will advance one row every time the instrument is triggered, and execute only the commands on the new rows. If this is Off, table behavior is normal (play arrows will move at the speed of 1 row per tick)
-
table: Select a table the instrument will always run. To clone a table here:
NAV+(EDIT,ENTER). Make a new table by selecting a higher number not yet in use.
Sample Import Screen
You can enter the sample import file browser by hitting ENTER ENTER (press the ENTER key twice in quick succession) when you are in sample field on the Sample Instrument Screen. This double-press behavior provides a quick way to access the sample import file browser from the sample field in the Sample Instrument Screen.
When in the Project Screen, you can access the sample import file browser with a single press of the ENTER key on the "Import Sample" field.
Samples that you may want to import into a project can be located in any folder but it's recommended to keep them in the folder named /samples at the top-level of the sdcard as that is the default location for the sample import file browser to display when you enter it.
When you're done in the Import Screen, you can press NAV+LEFT to return to the screen you came from (either the Instrument Screen or the Project Screen).
Note: sub-directories will be sorted before files, but otherwise the files will be listed in an unspecified order (ie. not necessarily alphabetical order).
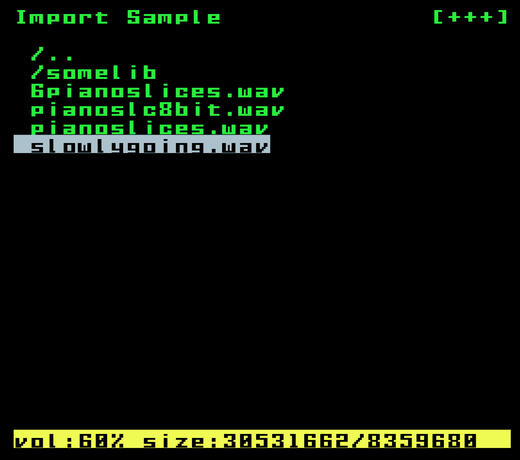
When entering the import file browser, the current folder is the library root folder /samples. All samples (.wav files) in that folder are listed.
Use the UP and DOWN arrow keys to navigate through the list of available sample files and subdirectories. Subdirectories are indicated with a / prefix. Press EDIT to enter a subdirectory, you can go back to the parent directory by navigating to the /.. entry and pressing ENTER. Hold down PLAY to audition the currently selected sample wave file. To import the currently selected wave file press ALT+PLAY.
Single Cycle Waveforms: Single cycle waveforms are specially marked with a ~ prefix in the file listing. These are WAV files with specific sizes (300 or 1344 bytes) that can be used as oscillators. When imported, they'll automatically be set to oscillator mode in the instrument settings.
A great collection of single cycle waveforms can be found in the Adventure Kid Sample Library.
The status bar at the bottom of the screen shows additional information about the selected file and other information such as:
- Current preview volume (vol:XX%)
- File size in bytes
- Available project sample storage size in bytes
Basic Controls
- Press
EDITto enter a subdirectory - Navigate to the
/..entry and pressENTERto go back to the parent directory - Hold down
PLAYto audition the currently selected sample wave file - Press
ALT+PLAYto import the currently selected wave file - Use
EDIT+UP/DOWNto adjust the preview volume
Importing Multiple Samples
You can import multiple samples in a single session without leaving the Import View. This powerful workflow allows you to quickly build up your project's sample library:
- Navigate to a sample file you want to import
- Press
ALT+PLAYto import it - Navigate to another sample file
- Press
ALT+PLAYagain to import it - Repeat as needed for all samples you want to import
Each sample will be added to your project's sample pool. The last imported sample will automatically be assigned to the current instrument. Previously imported samples remain available in your project and can be assigned to other instruments later.
When you're finished importing samples, return to the instrument screen by pressing NAV+LEFT.
Auditioning Volume Control
The Import View includes a convenient way to adjust the volume when previewing samples:
- EDIT + UP: Increase preview volume by 5%
- EDIT + DOWN: Decrease preview volume by 5%
The current preview volume is always displayed in the status bar at the bottom of the screen as "vol:XX%" alongside the file size information.
The preview volume uses a non-linear (quadratic) scale that provides more precise control at lower volumes, making it easier to fine-tune quiet previews. This setting is saved with your project and will be restored when you reload it.
Note: While there is no fixed limit for the number of sub-directory levels, there is a maximum of 256 files per directory. Also please note that while FAT formatted sdcards can support upto 256 characters per filename, picoTracker only supports upto 128 character file names and only with ASCII characters.
Supported sample file formats
Only uncompressed Wave (*.wav) files are supported using 8 or 16 bit, mono or stereo and they MUST only be 44.1KHz.
MIDI
Midi Instrument Screen
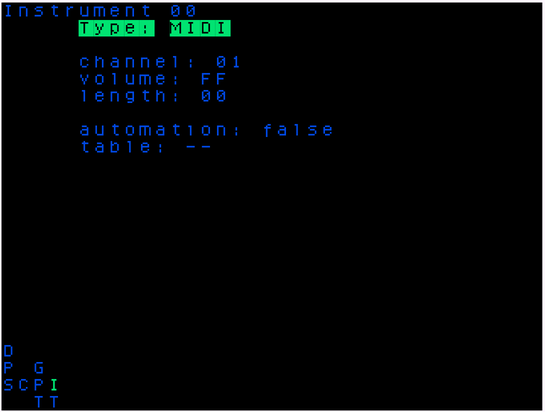
A MIDI instrument has the following settings:
- Channel - This can be set
01-16(in decimal not hex!) which is midi channel 1-16 respectively - Volume - The volume any NOTE ON will be sent to your device: FF=127, 00=00
- Program - MIDI program change value to send (0x00-0x7F). Program changes for each MIDI instrument are sent only once at sequencer start. Setting this to
--will disable sending program change messages entirely. - Length - Sets note gate length in number of ticks
- Automation - When on, the table play arrows will advance one row every time the instrument is triggered, and execute only the commands on the new rows. If this is
Off, table behavior is normal (play arrows will move at the speed of 1 row per tick) - Table- As above, select a table the instrument will always run. Clone a table here:
NAV+EDIT,ENTER. Make a new table by selecting a higher number not yet in use.
Synths
SID
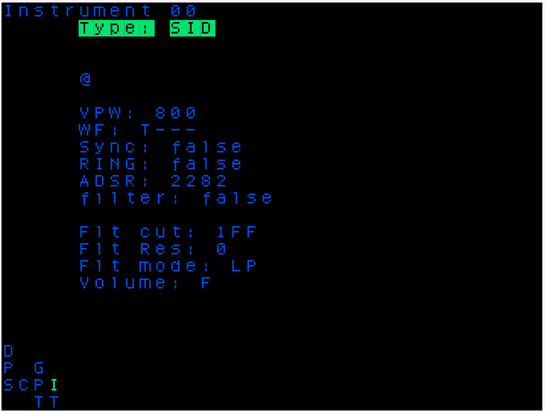
- SID Chip: Currently only "SID #1" is supported
- OSC: The oscillator to use: 0-2
- VPW: Pulse Width Modulation (PWM) of the oscillator, 000-FFF [1]
- WF: Waveform to use: TSQN (Triangle, Sawtooth, Square PWM, Noise (white-ish))
- Sync: Sync the oscillator (false/true)
- Ring: Enable or disable Ring modulation (false/true)
- A/D/S/R: Attack/Decay/Sustain/Release, each is single digit 0-15 value
Global SID chip settings:
- Filter: Set if the filter is on or off (false/true)
- Flt cut: The filter cutoff frequency 0-F
- Flt res: The filter resonance 0-F
- Flt mode: The filter mode: LP (lowpass), BP (bandpass), HP (highpass)
- Volume: Output volume: 0-F
The picoTracker currently only supports up to 3 SID instruments. Each of these represents a single monophonic oscillator with a single emulated "SID chip". Thus some of the settings above are shared between the 3 SID instruments because they are a global setting for the entire SID chip and not per oscillator.
SID Notes: [1] In the SID, the pulse waveform can have its width dynamically adjusted. This parameter controls the duty cycle of the square wave, which determines the harmonic content and timbre of the sound.
A pulse width of 0 creates a very thin pulse (almost a spike), while a value of FFF (4095) creates a full square wave. Values in between create asymmetrical square waves with varying harmonic characteristics.
OPAL
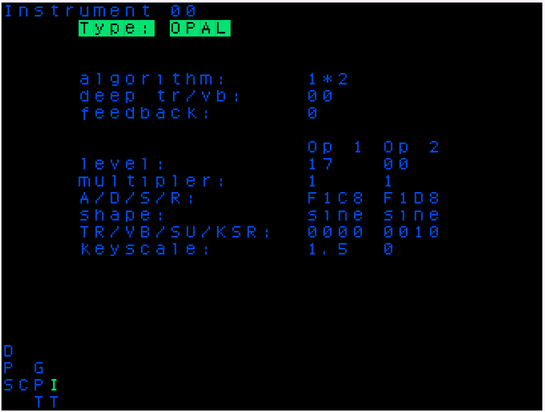
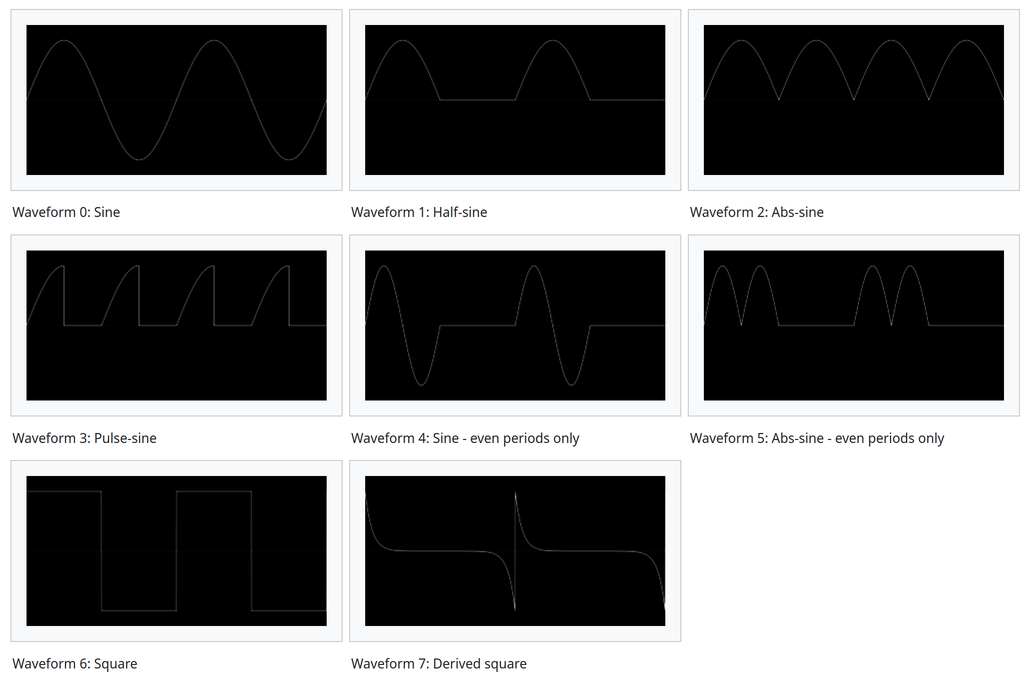
The OPAL instrument is an emulation of the FM synth "retro soundcards" of the PC DOS era. Each "OPAL" instrument is made up of 2 FM operators that can be in configured for either standard 2 OP FM or in parallel as 2 additive oscillators. Each operator can have one of 8 different waveforms as shown below.
The OPAL instrument has settings for both the instrument as a whole and per each of the 2 operators.
The picoTracker currently only supports up to 3 OPAL instruments. Because each of the instruments is a single monophonic voice, using the same instrument simultaneously in the picoTracker 8 track sequencer will work as if you were controlling an external monophonic synth via MIDI output and cause the following notes to cut off the previously playing note on that OPAL instrument.
Instrument wide settings
- Algorithm: Select either 2 Operator FM
(1*2)or Additive(1+2) - Deep tremelo/vibrato: Enable/disable Deep tremelo or vibrato effect
- Feedback: Turn on/off feedback for Operator 1
Per Operator settings
- Level: Operator output level attenuation, hence 0 is highest output level
- Multiplier: Frequency multiplier,
0=1/2, 1=1, 2=2, 3=3etc - A/D/S/R: Attack/Decay/Sustain/Release, each is single digit 0-15 value
- Shape: Waveform share, 8 to choose from, see waveform drawings below
- TR/VB/SU/KSR: Tremelo, Vibrato, Sustain and Envelope Scaling (KSR)
- Keyscale: Attenuates output level towards higher pitch:
1=3.0 dB/oct, 2=1.5 dB/oct, 3=6.0 dB/oct
Exporting an Instrument
- Make sure your instrument has a name set in the "name:" field
- Each instrument must have a unique name before it can be exported
- The default instrument type name (e.g., "Sampler", "MIDI", etc.) is not considered a valid name
- Navigate to the instrument you want to export
- Select "Export" from the instrument menu
- Press OK to continue after the export is complete message is shown
Exported instruments are stored in /instruments/ on your SD card.
NOTE: In the future the sample for the instrument will be stored in the same directory as the instrument file but for now is not exported.
Importing an Instrument
- Navigate to the instrument you want to import
- Select "Import" from the instrument menu
- A file browser will appear showing all available
.ptifiles in the/instrumentsdirectory - Select a
.ptifile to import, use the key comboALT+PLAYto import it - The imported instrument will replace the currently selected instrument
- Press OK to continue after the import is complete message is shown
Tips for Instrument Management
- You can organise your instrument files into subfolders inside the
/instrumentsdirectory but exported files will always be saved in the root/instrumentsdirectory - Use descriptive names in the instrument's name field to easily identify them when importing later
- The instrument name is used for the export filename, so ensure it's set before exporting
- Back up your
/instrumentsdirectory when backing up your picoTracker data on your sdcard
Limitations of instrument performance
The picoTrackers CPU limits the number of simultaneous instruments that can be played at once. The specific limit depends on the instrument type and the settings of each instrument. In general the limit is:
- 4-5 Sample instruments or
- 3 OPAL instruments or
- 3 SID instruments
- 8 MIDI instruments
Because they are very light weight when it comes to CPU usage, 8 MIDI instruments can be sequenced at once, the limit then coming from the limit of 8 channels (aka tracks) available for sequencing on the picoTracker.
Even given the above limits, it is still possible to mix and match instruments of different types roughly within the above limits. For example 2 samplers, 1 OPAL, 1 SID and 4 MIDI should in theory be possible. Note this only applies to simultaneously sounding (playing) instruments and if care is taken to limit the number of simultaneously sounding instruments, a larger number of instruments can be defined within a project.
Exporting and Importing Instruments
picoTracker allows you to save and reuse your instrument settings across different projects through the instrument export and import functionality. This feature is particularly useful for building a library of your favorite synth instruments or using instruments created by other picoTracker users.