Device Management
The device screen allows you to manage settings for the picoTracker device hardware itself.
Note: the picoTracker saves its device settings to the SDCard so if you replace the sdcard in your picoTracker, the device configuration will reset to factory defaults.

MIDI
- MIDI device: Lists the picoTracker MIDI interfaces available. Available options are:
- None
- TRS
- USB
- TRS+USB
- MIDI sync: Enable/disable MIDI clock sync messages being sent by the picoTracker.
Line Out Mode (1st Edition RP2040 model only)
On the first edition picoTracker, the audio output can be set to one of 3 amplification levels to make the audio level output more useful for Line Level output or Headphone output. The 3 possible settings are:
HP LowHP HighLine Level
NOTE: A reboot of the picoTracker is required to apply the newly changed audio output level!
*PLEASE exercise caution when using earphones or headphones!
Remote UI
This setting enables or disables sending commands to a computer attached via USB to the picoTracker running a "remote UI" application that can mirror the display from the picoTracker.
The official picoTracker remote UI web application is available , it works only with Chromium based browsers.
Import resampler
This settings allows the selection of the sample rate converter used during sample import. Check the sample instrument section for more details.
Display Brightness
The display brightness setting allows you to adjust the backlight level of the picoTracker's LCD display. The brightness can be set from 05 (minimum brightness) to ff (maximum brightness). The default value is 80 (medium brightness).
Adjusting the brightness can help with battery life (lower brightness uses less power) and visibility in different lighting conditions.
Theme Settings
The Theme Settings screen allows you to customize the appearance of the picoTracker interface, including fonts and colors. To access the Theme Settings screen, select the "Theme settings" option on the Device screen.
See the Theme Settings chapter for more details.
Updating Firmware
First copy the new firmware file you want to install to the top level directory of your sdcard using your computer and then insert it back into your Advance.
Then go to the Device Screen and select the Update firmware menu item. This will reboot the Advance into its "bootloader" mode.
Once the Advance has booted into the bootloader mode, you will see the bootloader user interface on the screen:
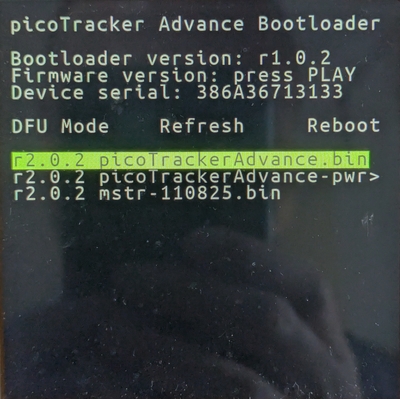
You can now use the arrow buttons to select the .bin firmware file to install from the sdcard and press ENTER to install the firmware.
Once installation of the new firmware is completed, you can use the arrow keys to move the selection to the Reboot on screen option to reboot into normal mode and be running the newly installed firmware.
NOTE: If for some reason you cannot boot into the normal mode on your Advance, you can also boot the Advance into its "bootloader" mode by holding down the boot button, accessible through a small hole below the sdcard slot as you keep pressing the power button for approximately 8 seconds to reboot into the bootloader mode.