Project Management
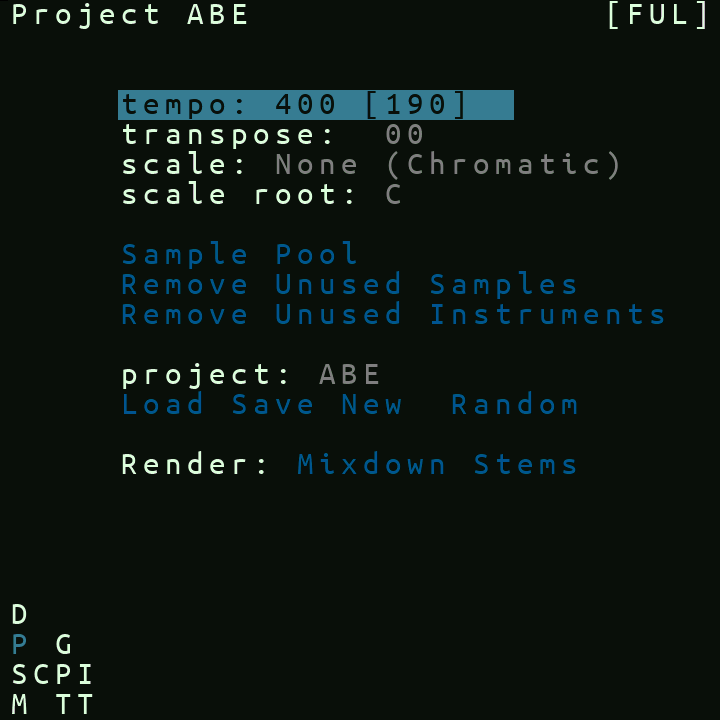
On the project screen you change various settings of the current project, Save the current project,Rename it (including giving it a Random new name) create a New blank project or go to the project browser screen to load a project from the /projects directory on your sdcard.
Your current project settings are backed-up automatically every minute except when the sequencer is running, ie. when the current project is playing. This means that should you restart the picoTracker or a crash occurs, your current project state within the last minute will be restored when you restart the picoTracker.
You can explicitly save the current project by pressing [SAVE] on the project screen. By doing this you can then later on revert to the state that you just saved by reloading the current project using the [Load] button on screen button on the project screen.
Current Project settings
- Tempo:: Can be set between 60bpm [0x3c] and 300bpm [0x190]. You can also tap tempo: move the cursor to the
tempofield and press EDIT repeatedly in time. - Transpose: Live transposition of every triggered instruments.
- Scale: Set the scale that will applied to all notes entered in the project. When entering a note in the Phrase screen, you will only be able to enter notes that belong to the selected scale. See the reference for a list of all available scales.
- MIDI CHANNEL MAP: Assigns an incoming MIDI channel to each of the eight song channels. The values run from
01through10in hexadecimal;00leaves that song channel under normal sequencer control. The eight values correspond to song channels from left to right. Assign the same MIDI channel more than once to allow it to play multiple notes at the same time. - MIDI DEFAULT PROGRAM: Selects the initial program (instrument) for each of the 16 MIDI channels when the project loads. Values use picoTracker's instrument numbers from
00through3F, so00selects instrument00and3Fselects instrument3F. Changing a value selects that instrument immediately for subsequent notes on its MIDI channel and keeps it as the new default. MIDI channels are ordered from01through10in hexadecimal, moving left to right across the first row and then the second. A later MIDI Program Change replaces the current selection for that MIDI channel until the project is loaded again or its default is edited.
Hold ENTER and use LEFT/RIGHT to change a MIDI value by one, or DOWN/UP to change it by 10 hexadecimal.
|
Note: For best tap tempo results, tap at least 2-3 times at a steady pace. If taps are too far apart, tap detection restarts from the latest tap. |
Rendering Selection Display
The Render: section at the bottom of the Project screen shows information about your current selection from the Song screen. When you make a grid selection in the Song screen (using EDIT+LEFT/RIGHT/UP/DOWN), the Project screen will display the selected row range and channel range next to "Render:" — for example, Row[03-0A] Ch[1-4]. This is the range of rows that will be used for either the mixdown or stems rendering to file as well as the range of channels that will be included in the rendering.
If no selection is active in the Song screen, the Project screen will display [No Selection] instead. You must have an active selection before using the Mixdown or Stems render buttons; otherwise, pressing them will show an error message.
Current Project optimisation
- Compact Instruments: All unused instruments will have their sample set to (null) and the sample file will be removed from the projects sample subdirectory.
Project Management
- project: Displays the current name of the project and allows you to edit it
- Load Go to the project file browser to load a different project or reload the last explicitly saved version of the current project
- Save Save the current project NOTE: saving currently cannot be done during playback.
- New REPLACE the current project with a new, Blank project.
- Random RENAME the current project with a new, Randomly generated name.
- Import Sample Access the sample import file browser with a single press of the ENTER key. When you're done in the Import Screen, you can press NAV+LEFT to return to the Project Screen.
The project name is limited to 16 characters.
You edit to project name by moving onto the name field and then holding the ENTER key while using the UP and DOWN keys to change the selected character and LEFT and RIGHT keys to move the cursor to the left or right of the current character. When on the last character, you can add chararacter to the end of the project name by using the RIGHT key. To delete a character, place the cursor on the character and press ENTER+EDIT.